> ## Documentation Index
> Fetch the complete documentation index at: https://docs.zocomputer.com/llms.txt
> Use this file to discover all available pages before exploring further.
# Connect to your server
> How to use your Zo as a remote development environment
You can access your Zo Computer using our built-in [ways to interact with Zo](/), but sometimes it's useful to connect to your Zo server directly.
This guide will walk you through connecting to your Zo server over SSH. One powerful use case SSH enables is using your Zo as a **remote development environment**, allowing you to use Zo from your favorite IDE running on your computer.
**Secure Shell Protocol (SSH)** is like a secure phone line to another computer.
The secure connection is established using a pair of keys: a **public key** (which can be shared with others), and a **private key** (which is kept secret). Only computers with a known public key registered on your Zo server will be allowed to connect.
An **Integrated Development Environment (IDE)** is an application that programmers use to develop software and operate servers. Once you've connected an IDE to your Zo server, you can use it to write code (or edit any text file) on your Zo and run commands.
If you don't have a favorite IDE already, we recommend [Cursor](https://cursor.com), the best choice for AI-assisted coding.
# 1. Generate an SSH key on your computer
Open the Terminal application on your computer.
Run the command below, replacing the email used in the example with your own email address.
```sh theme={null}
ssh-keygen -t ed25519 -C "your_email@example.com"
```
When you're prompted to "Enter a file in which to save the key", you can press Enter to accept the default file location.
When you're prompted to "Enter a passphrase", you can press Enter to leave it empty, or choose a passphrase.
For an additional layer of security, you can add a passphrase to your SSH key. In order to avoid entering the
passphrase every time you connect, you can securely cache the key in the SSH agent. GitHub has a [helpful
guide](https://docs.github.com/en/authentication/connecting-to-github-with-ssh/working-with-ssh-key-passphrases) that
you can follow to set this up.
Run the command below to view your public key:
```sh theme={null}
cat ~/.ssh/id_ed25519.pub
```
You'll see something like this:
`ssh-ed25519 YOUR_ECDSA_PUBLIC_KEY your_email@example.com`
# 2. Register your public key on your Zo
Open the Terminal in your Zo application.
Run the command below to edit your authorized keys file:
```sh theme={null}
nano ~/.ssh/authorized_keys
```
Paste your public key in the editor.
Save and exit the editor by pressing `Ctrl + X`, then `Y`, and finally `Enter`.
# 3. Set up a SSH service on your Zo
Open the Sites page in your Zo and navigate to the Services tab.
Click **"Add service"** to create a new service and fill in the details below:
| | |
| --------------------- | --------------------------- |
| Label | `ssh` |
| Local port | `2222` |
| Type | `tcp` |
| Entrypoint | `/usr/sbin/sshd -D -p 2222` |
| Working directory | Leave empty |
| Environment variables | None |
When your SSH service is up and running, take note of the **Host** and **Port**.
 # 4. Connect to your Zo
Open the Terminal on your computer. Run the command below, replacing the port and host with your service's port and host.
```sh theme={null}
ssh -p root@
# example: ssh -p 10000 root@ts1.zo.computer
```
If all is well, you should find yourself inside your Zo.
You can exit the SSH session by typing `exit` or `Ctrl + D`.
## Create a shortcut to connect
In your computer's terminal, run the command below to edit your SSH configuration file:
```sh theme={null}
nano ~/.ssh/config
```
Paste the following configuration, replacing the **Port** and **HostName** with your service's port and host:
```sh theme={null}
Host zo
HostName ts1.zocomputer.io
Port 10872
User root
ServerAliveInterval 30
ServerAliveCountMax 3
IdentityFile ~/.ssh/id_ed25519
```
Save and exit the editor by pressing `Ctrl + X`, then `Y`, and finally `Enter`.
Now, you can run `ssh zo` to connect to your Zo from your computer's terminal.
# 5. Connect your IDE
Different IDEs have different ways to connect to remote servers. In this guide, we'll show you how to connect [Cursor](https://cursor.com) to Zo, but other IDEs can be connected in a similar way.
First, install [Cursor's official Remote SSH extension](https://marketplace.cursorapi.com/items/?itemName=anysphere.remote-ssh).
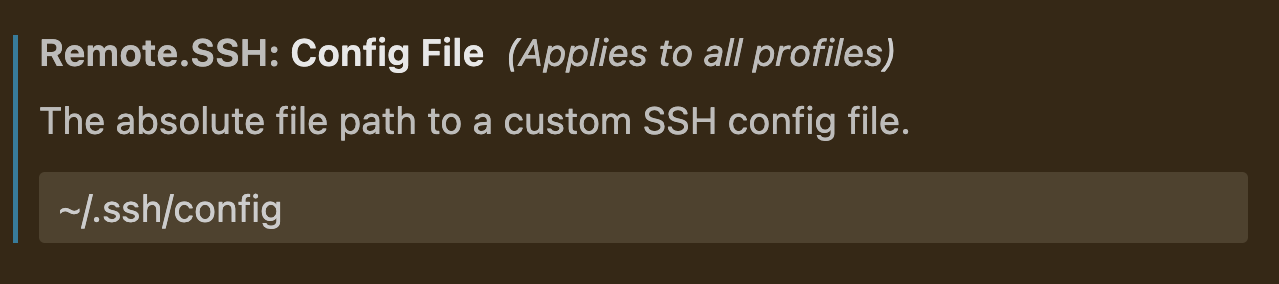
In the extension's settings, enter your SSH config file path:
# 4. Connect to your Zo
Open the Terminal on your computer. Run the command below, replacing the port and host with your service's port and host.
```sh theme={null}
ssh -p root@
# example: ssh -p 10000 root@ts1.zo.computer
```
If all is well, you should find yourself inside your Zo.
You can exit the SSH session by typing `exit` or `Ctrl + D`.
## Create a shortcut to connect
In your computer's terminal, run the command below to edit your SSH configuration file:
```sh theme={null}
nano ~/.ssh/config
```
Paste the following configuration, replacing the **Port** and **HostName** with your service's port and host:
```sh theme={null}
Host zo
HostName ts1.zocomputer.io
Port 10872
User root
ServerAliveInterval 30
ServerAliveCountMax 3
IdentityFile ~/.ssh/id_ed25519
```
Save and exit the editor by pressing `Ctrl + X`, then `Y`, and finally `Enter`.
Now, you can run `ssh zo` to connect to your Zo from your computer's terminal.
# 5. Connect your IDE
Different IDEs have different ways to connect to remote servers. In this guide, we'll show you how to connect [Cursor](https://cursor.com) to Zo, but other IDEs can be connected in a similar way.
First, install [Cursor's official Remote SSH extension](https://marketplace.cursorapi.com/items/?itemName=anysphere.remote-ssh).
In the extension's settings, enter your SSH config file path:
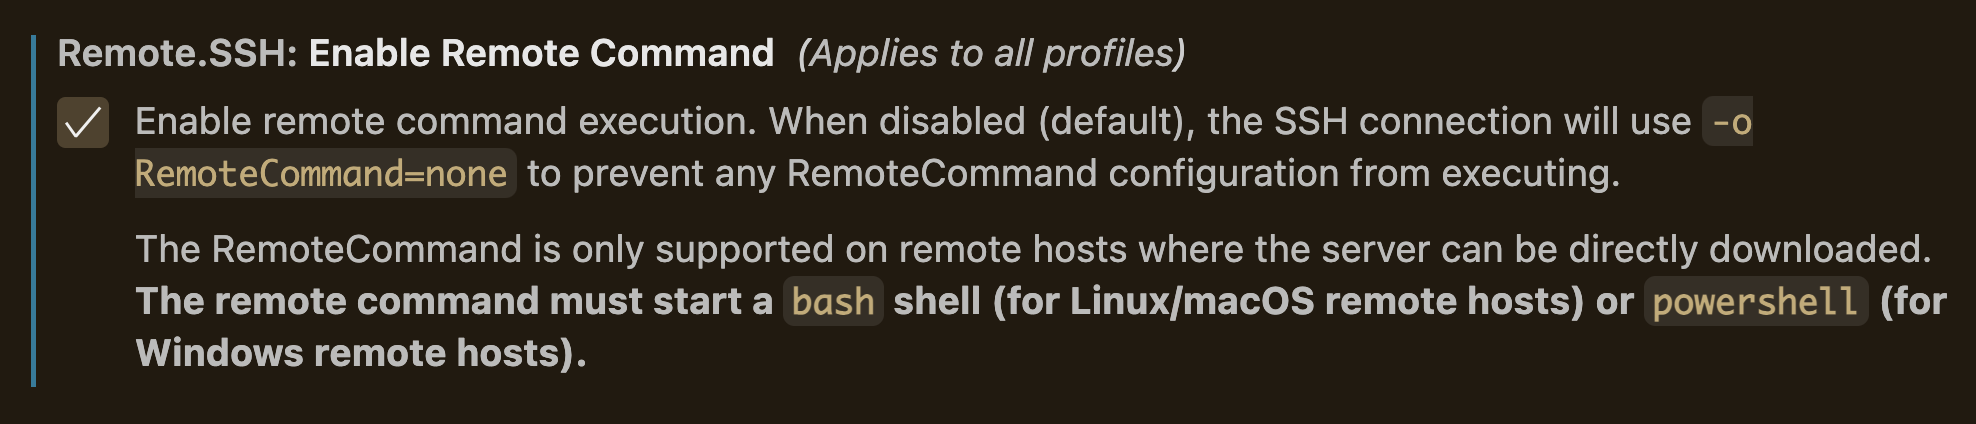
 Also in the extension's settings, enable Remote Command Execution:
 In the command palette, find `Remote-SSH: Connect to Host...` and select `zo`.
 Another Cursor window will open, connected to your Zo.
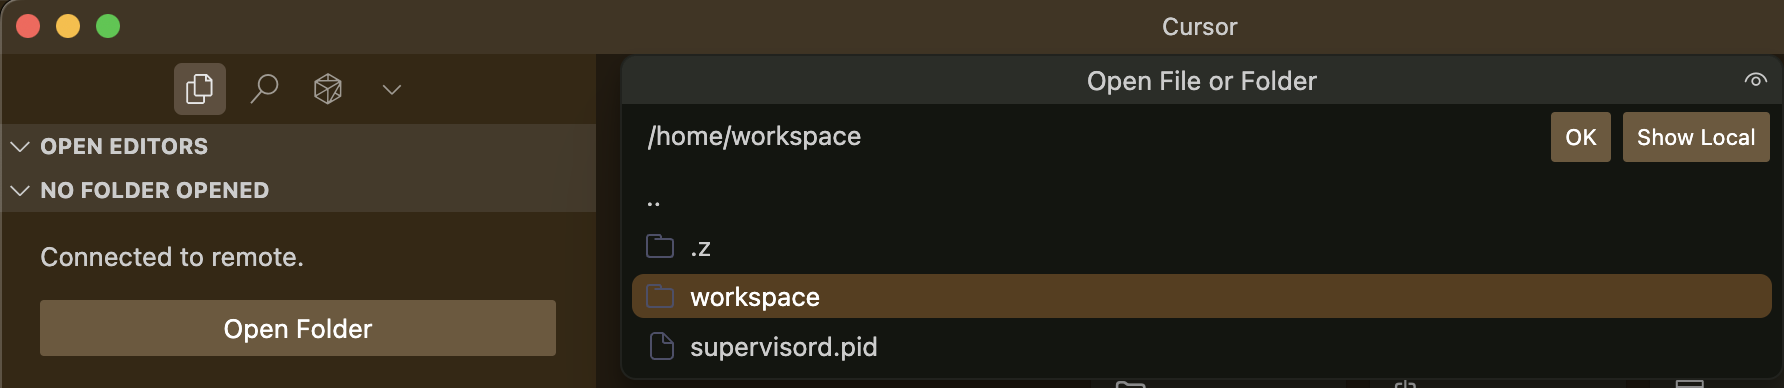
In this new window, open the `/home/workspace` folder on your Zo.
The files you can see in the Zo application are in `/home/workspace` on your Zo Computer.
Another Cursor window will open, connected to your Zo.
In this new window, open the `/home/workspace` folder on your Zo.
The files you can see in the Zo application are in `/home/workspace` on your Zo Computer.
 That's it! Now you can use your Zo from Cursor.